Facebook
RSS
Showing posts with label Windows XP. Show all posts

Remove Virus copy of shortcut and Recycler (ramnit)

Virus copy of the shortcut and the Recycler (ramnit) is now on the rise. Many computers are infected and affected. To clean the virus copy of the shortcut and Recycler (ramnit) were easily easy to hard. Sometimes we can clean it, but apparently some time later came back. Well, on this occasion, said : sobatpc.com will try to share how to remove and clean Viruses copy of the shortcut and the Recycler (ramnit). Here's the tutorial.

Here are the steps that you can try to eliminate the virus copy of the shortcut and recycler (ramnit)

1. Download Dr.Web LiveCD ISO file first, klo not have please download the http://download.geo.drweb.com/pub/drweb/livecd/
2.Once the software is successfully downloaded Dr.Web LiveCD, burn into CD / DVD.
3. Connect the USB flash and external HDD to the computer.
4. Boot the computer through CD / DVD ROM.
5. Then the screen will display "Welcome to Dr.Web LiveCD".
6. Select "Dr.Web LiveCD (Default)" and then press the "Enter" key on the keyboard.
7. Wait a few moments to appear Dr.Web LiveCD interface that will display the application "Dr.Web Scanner" automatically. Dr.Web Scanner is working to conduct an examination of a computer buddy of the possibility of viruses.
8. Scan to HDD, on-screen "Dr.Web Scanner" select Drive location will be in check and make sure the buddy check list option "Scan subdirectories" that Dr.Web can perform checks on the directories and subdirectories for optimal cleaning. If the screen does not appear Dr.Web Scanner double click the icon "Dr.Web Scanner" contained on the Desktop.
8. Then click the [Start] to begin the examination process (scan).
9. Wait a while until the scan is completed. If you find any viruses, Dr.Web will inform the infected file and the type of virus that infects the virus information available columns.
10. Click the [Select All] to select all objects / files to be in the clear or friend can determine which files have to be my friend clean it with a check list on the options available.
11. Then click the [Cure] to clean up files that have been infected with the virus.
12. Wait until the cleaning process is completed.
13. Re-scan the computer to ensure your computer clean of viruses.
14. Restart the computer.

I think may Copy of the shortcut + virus recycler (ramnit) was missing from the PC pal. Hopefully how to remove virus recycler copy of the shortcut + (ramnit) this helps mate! amen ...

Happen if the internet connection is not friendly pal, it's good buddy to do some of the tips below so that the virus is not too swayed by my friend in the company ngeblok virus ramnit duplicate files by using the feature "Software Restriction Policies". But this feature only on the operating system Windows XP Pro, Vista, 7, Server 2003 and Server 2008. Well while waiting for the download Dr.Web LiveCD ma pal. The trick please see below:

1. Click the [Start]
2. Click [Run]
3. In the Run dialog box, type secpol.msc and click the [OK]
4. Once the screen appears "Local Security Policy", right-click menu "Software 5. 5.Restriction Policies" and click "Create New Policies" or "New Software
Restriction Policies" if using Windows Vista / 7
6. Then right click on the "Additional Rules", then select "New Hash Rule ..."  Then the screen will display "New Hash Rule". In the "File Hash", click the [Browse] and specify one of the duplicate file viruses that have the icon "Folder" with a size of 105 KB (example C: WindowsExplorermgr.exe) and click the [Open]. In the "Security Level", select [Disallowed]. Then click the [OK].
source : http://sobatpc.com
[ Read More ]

Speed up windows xp startup

Have windows xp start up we felt very slow, and makes us feel lazy and annoying to wait, if the computer have a spec under the rate could have the computer becomes very slow.
Usually this is caused by several things such as our computers have a program or service that runs automatically. But not all programs are required at the time. Program can be temporarily disabled so as not to overburden the windows. Computer so that we can work faster.

Here's a tutorial How to speed up windows xp startup. Please try

I. First Method
On the desktop click Start select Run, type msconfig, click OK
windows run image

Click the Startup tab, uncheck the program that is not too much you need, if any time you need it, you can reactivate it by giving a tick

3. Click the Sevice tab, you can remove the tick service is deemed unnecessary, such as Automatic Updates, Net meeting, Messenger.

4. Click the Boot.ini tab
Set the time out, you can enter the numbers 10 or greater than ten. careful use numbers smaller than 10 because it can make your computer unstable. This process will accelerate the process of booting windows.Tekan the Apply button and then the OK button
Restart the computer to see the changes.

II. Both ways

By using services.msc
1. On the desktop click Start select Run, type: services.msc
Click OK
2. In the dialog box click on the program services that will be set, whether it be enabled or disabled.
3. For example I'll disable messengger, then I double click on Messengger, until the startup options dialog box type
4. At startup type select disabled, meaning messengger will be disabled
Click on OK.
5. Do this on several sevice or application that may be temporarily disabled (disabled)
6. You have managed to reduce the burden on windows startup.
Hopefully your computer can be faster than the original.
source :  http://artikelkomputerku.blogspot.com/2008/11/cara-membuat-proses-start-up-windows.html
[ Read More ]

Disabling the Security Center in Windows XP

Every time we connect to the internet and if the security center in windows xp running or not disable it, windows xp security center will update automatically, and sometimes it can slow the performance of our internet.

  • Windows security Center is a component that works under Windows XP service pack 2 for providing information about the status of your antivirus software, firewall and Automatic update. Below is an image of a Windows Security Center.
disable windows xp security center
  • Sometimes, it may become annoying as you receive frequent message in forms of pop-up balloon alerts telling you. Below are two ways that you can choose to stop this disable this feature.
  • Disable Alerts
  • Turn off Windows Security Center

Disable Alerts

  • Select Menu Start > Control Panel and double-click on the icon security Center.

security alert

  • In the Menu bar Resources, click on Change the way Security Center alerts me . Below image will appear on your screen.

security alert setting

  • Turn off all alerts by unchecking the cross box. Finally click on OK .


Turn off Windows Security Center

  • You may choose to turn off the windows security center if you are more than sure your personal firewall is effective.
  • To do this setting, click on menu Start and select Run .
  • Then type Services.msc and click on Ok .
  • Scroll down and double-click on Security Center to open it.


system alert security

  • In the Startup type, select Disable and click on OK .

disable security alert windows xp


This document entitled « [Windows XP] Disabling the Security Center  » from Kioskea.net (en.kioskea.net) is made available under the Creative Commons license. You can copy, modify copies of this page, under the conditions stipulated by the licence, as this note appears clearly.
[ Read More ]

Changing BIOS settings

Depending on your computer model, the way you will access your BIOS set up menu will differ. To change your BIOS settings, you must enter the computer’s CMOS (complementary metal-oxide semiconductor) setup screen during the startup process. CMOS is a small chip that stores information about your particular system and its devices. If you want you can also try out the following steps.

1) Restart your computer. Go to "Start," "Turn Off Computer" and "Restart."
2) Press the correct key to enter your BIOS before the Windows loading screen appears. This key will vary depending on your computer manufacturer and BIOS. Most systems use "Esc," "Del," "F2" or "F1." The key will be displayed briefly when you boot or you can check your computer manual. If pressing one of those keys takes you to a boot order screen, choose "Setup" to continue to your BIOS settings.
3) Use your arrow and function keys to navigate the tabs and to change settings. Each BIOS will have specific instructions at the bottom and right of the screen.
4) Understand the different settings under each tab. Main changes the system date and time. This is different than the time listed in your notification tray. Security sets, clears or changes system passwords. These passwords can restrict who has access to the BIOS settings. Advanced changes your boot order and reserved video memory. Tools performs a diagnostic hard drive test.
5) Press "F9" if you want to restore your BIOS to default settings.

Asrock model motherboard default bios setting.
asrock motherboard bios setting
image source http://www.xbitlabs.com/
Another model motherboard default bios setting.
bios setting another motherboard
image source : http://aserebln.blogspot.com

or

It will automatically check to see if you have a bootable CD in your CD drive. If you computer has a floppy drive, it will check to see if your have a boot disk in the floppy drive. Then once it has checked all possible locations for a boot disk, the system will default to your hard drive and start booting Windows.

1. Turn on the computer.
2. Press the F1 key when the keyboard light comes on. Wait about 5 seconds.
3. Press the F5 key and press ENTER. This restores the default settings of the BIOS. Wait about 5 seconds.
4. Press the F10 key and then press the ENTER key. This saves and exits the BIOS.
source : http://forums.techarena.in
[ Read More ]

Restore files or folders are hidden by virus on flashdisk

Flashdisk is a tool to store data like a hard disk on a computer device. Flash disk are very useful for us who often need a tool to store the data that we can take it everywhere. Well if the flash disk that we have and in which there are files or important data we need suddenly affected by the virus, how we should fix the flash disk is affected by the virus?

Before we discuss more about how to fix flash disk that is affected by the virus, here I emphasize, in this case I will discuss is how to fix a flash disk that is exposed to the virus Trojan win32.VB.pod. Or how do we fix the flashdisk filesand folders  hidden by viruses. Because the system is the work of the trojan win32.VB.pod with our original hidden files and duplicate files in a format displays. Exe. It's simply that we fooled to click on the duplicate files, and then spread this trojan win32.VB.pod will be greater.

Example :
Right click on your flash drive and select Properties
Compare capacity Used Space and Free Space, Used Space, if greater than the Free Space, but the files or folder in flashdisk is not as much as it is proud careful because chances are there you are in hidden files, but if otherwise, or even your flash file is empty then you are missing all.

If your files are still there or hidden by a virus win32.VB.pod, then perform the following steps:
  • Stop the anti-virus protection was installed on our computers
  • If only to see the contents from the folder:
    -open the folder options (Tools-> Folder Options) on windows explorer
  • folder option windows xp
  • Select the View tab
  • show hidden folder and files windows xp
  • Select the Hidden files and folders select Show hidden files and folders
  • yes files and folder
    Then uncheck and checklist the "Hidden protected operating system files (Recommended) then click Yes
This way the contents of files and folders in the flashdisk can be seen, but one thing looks weird, image files affected by virus-colored opaque, and when it wants to change the file attribute, disable alias hiddennya die and not be changed from the file properties, (this is because the virus has changed the file attribute to superhidden).

To restore the files and folders hidden by the virus to their original form (can be viewed as normal) follow these steps:

1. open a Command Prompt (by pressing the Windows key R or by clicking the Start menu-> Run). after emerging the Run window type cmd.
open cmd on run

2. After the Command Prompt window appears type the Drive Letter and Path (name of drive / flasdisk) (can be viewed in My Computer).
drive letter of flash drive

example : the drive of flash disk is in drive F:
drive of flash disk in f

then press the Enter key
After Appears Drive / Flash is. Then Type attrib -h -s *.* /s /d and press Enter.

attrib to show files command prompt

change file attributes are being procces wait until its Drive Letter prompt appears again
being proccesses drive letter flash drive
Done, now all files can be viewed as normal


Note: For those of you who lazy or dizziness look at the script and the steps are long.
You can use the software made my friends that can be download here
how its use in included in the file.

Sources: Agungosx / http://www.blogging-plus.com/bagaimana-cara-memunculkan-kembali-file-dan-folder-yang-di-sembunyikan-oleh-virus/
[ Read More ]

Problem detect when install windows xp on laptop

In previous posts I've written about how to Install Windows XP to Acer Aspire M1641, and now I try to post almost the same but at this time to install windows xp on laptop in case of error.

At the time of setup windows instead appear as usual on install but instead an error message that comes out. After the restart try to repeat the installation process again and hope that the installation process goes smoothly. But it turns out the same thing happen again. do not worry this happens is a common thing usual in his bios settings are wrong.


This error display when the windows install like this.
installl-windows-xp-error


The following are the steps you should do:

1. Try to get into the BIOS settings, at start up laptop press F2

2. Go to the tab ADVANCE

3. Change the SATA mode to IDE instead of AHCI option

4. After that go to the BOOT tab and change the boot into cd / dvd rom instead of harddrive

5. Press the F10 key to exit the BIOS to save the bios settings that we changed earlier.

6. Select yes

7. Boot through the windows CD and wait until the install is finished as usual.

In some cases after optionnya SATA mode is changed to an IDE / compability erorr messages that had appeared again and I do not find the install is successful.

The question that we might question, "Why can not AHCI mode during the install windows xp?"
AHCI is arguably a kind of SATA if the desktop if xp can not read normal unless XP already compiled his own plus the SATA drivers.
So we use the competible IDE mode with windows XP without having to compile the program with the addition of certain drives. some source http://justshareinfo.blogspot.com/
[ Read More ]

NTLDR or NTDETECT.COM Not Found

NTLDR or NTDETECT.COM not found If you find an error that NTLDR is not found when booting. solution:
a. For the type of FAT partition
- Please you to boot from your Win98 floppy and copy the files NTLDR or NTDETECT.COM from i386 directory to the drive stem / root (root) C: \

b. To partition an NTFS type-Enter the Windows XP CD and boot from the CD.
-At options appear first R = Repair , pressthe R key
- Press the number that corresponds with the location of the Windows installation you want to repair.
- Usually # 1 - Enter the administrator password if necessary.
- Enter the following command, where X: is the address of the CD ROM drive.
- Write: COPY X: \ i386 \ NTLDR C \:
- Write: COPY X: \ i386 \ NTDETECT.COM C: \
- Remove your CD and type exit, or just coffee NTDETECT.COM and ntldr from the windows that are still good or your friends and copy to directory C: \ you (make you a slave hdd first).

If the Master Boot Record error then can be corrected with the application Win Image with your HDD records used to be a slave on a windows computer is still good, and then install winimage and in bar disk select the drive letter your windows broken HDD and choose Properties to edit Master boot record and select reset and if there is a warning not hesitate to select yes easily useful.
Reference : http://yogialghofiqhi.blogspot.com
[ Read More ]

NTOSKRNL not found and HAL.DLL Missing or Corrupt

NTOSKRNL not found
If, NTOSKRNL Damaged or Missing (Missing or Corrupt) If you find an error message as follows: "NTOSKRNL not found" the solution:


- Insert the Windows XP CD and boot from the CD.
- When the options appear first R = Repair, press the R key
- Press the number that corresponds with the location of the Windows installation you want to repair.
- Usually # 1 - Change to the CD Drive you are.
- Write: CD-Write i386: expand ntkrnlmp.ex_ C: \ Windows \ System32 \ ntoskrnl.exe
- If Windows XP is installed elsewhere, change according to location.
- Remove your CD and type exit-only copy ntoskrnl.exe from your friends computer system32 directory to your system32 directory with a record of your hdd on slave made it first on your friend's computer / windows that are still good and his windows same version of SP1 with SP1, SP2 with SP2 and not vice versa.

Hal.dll corrupt missing
HAL.DLL Damaged or Missing (Missing or Corrupt) If you get an error message regarding corrupt or missing hal.dll file, it is possible BOOT.INI file has incorrect configuration (misconfigured). The solution:
- Insert the Windows XP CD and boot from the CD.
- When the options appear first R = Repair, press the R key
- Press the number that corresponds with the location of the Windows installation you want to repair.
- Usually # 1 - Write: bootcfg / list Displays the contents / entries in the BOOT.INI file while in
i-Write: bootcfg / rebuild Improve the configuration of the BOOT.INI file-Remove your CD and type exit.
Reference : http://yogialghofiqhi.blogspot.com
[ Read More ]

How to Repair Windows XP Installation

Repair windows xp
How to Repair Windows XP Installation If you are damaged or corrupted when you do not have another operating system to boot, you can do a repair installation , which works as the settings (settings) is the solution:


- Make sure you have the key Windows XP valid.

- If you asked for an administrator password, you should choose the Repair option the second, not the first.

- Insert your Windows XP CD and do the boot from the CD.

- Then will come the second repair option R = Repair, press the R key This will start the repair.

- Press F8 to agree to further process the "I Agree at the Licensing Agreement - Press R when the directory where you installed Windows XP. Usually C: \ WINDOWS. Next will be checked drive C: and start copying files. And automatically restart if necessary. Let your CD in the drive.

- Next you will see a picture of "progress bar" that is part of the improvement, that looks like a normal XP installation normally, including "Collecting Information, Dynamic Update, Preparing Installation, Installing Windows, finalizing Installation" .- When asked, click Next- When asked to enter a key, enter key your valid Windows XP.

- Normally you want to remain in the same Domain or Workgroup computer will restart .- .- Then you will have the same screen as the activation of the system when a normal installation.

- Register if you want (usually not necessary).

- Done Now you can log in with your existing account.

Reference : http://yogialghofiqhi.blogspot.com/
[ Read More ]

Corrupt or not detect Harddisk on windows xp

corrupt harddisk

Sometimes our computer got error or corrupton the hard drive when you start the computer here's a little solution ways how to fix it .
  • If your harddisk is Corrupt  you try to make the slave  on another computer and run checkdisk with Microsoft or third-party program, if there is a corrupt file note which files are corrupt and replace with another hard drive with windows files the same version ie both SP1 or SP2.

  • Your Harddsik is corrupt or not detect, try to open the existing data cable on harddisk and then insert it correctly , try to turn on his computer,if you still can not detect the harddisk, try to get into the bios and bios settings to default settings, usually just click F5 to restore the default bios settings of your computer. Other causes: IDE controller defective
If the above are not to solve try these steps:

If the directory \ WINDOWS \ SYSTEM32 \ CONFIG damaged or missing If you get the following error message: "Windows Could not Start Because the Following files is missing or corrupt \ WINDOWS \ SYSTEM32 \ CONFIG \ SYSTEM or \ WINDOWS \ SYSTEM32 \ CONFIG \ SOFTWARE"


Solution:
- Insert the Windows XP CD and boot from the CD.
- When the options appear first R = Repair, press the R key
- Press the number that corresponds with the location of the Windows installation you want to repair.
- Usually # 1 - Enter the administrator password if necessary.
- Write: cd \ windows \ system32 \ config
- Next depending on the location.

Damage:
- Write: ren system / broken.system
- Next depends on the location.

Damage:
- Write: copy \ windows \ repair \ system
- Write: copy \ windows \ repair \ software
- Remove your CD and type exit.
[ Read More ]

Download Software To Secure Folders and Files

Every time someone else borrow our computer, such as friends, brother or sister.
Often times the secret files / folders or any other secret files we are not supposed to critical data can be viewed / opened by someone else, and could have important data we even be erased by another. If so you should secure your files and folders from the hands of ignorant. Actually there are ways to separate a simple congenital windows that can be used to secure folders and files. But the simple name, it means very easily uprooted.But you can Download free Software to secure folders and files here.

As a solution, here are some free software that you can use to secure your files and folders.

1. Folder Lock.
folder lock
This software is free to secure the folder. Folder Lock is a software lock folder. The functions like a lock. Folder Lock will bring up a dialog box for a password every file you clicked. All the files in that folder will automatically be locked as well. The facilities offered vary, ranging from protection from viruses, encrypts and scrambles the data.

Download free Folder lock : Mirror 1 |  Mirror 2


2. Cryptainer LE.
Cryptainer LE
This software make data container or folder that you can use to store various kinds of data. You just copy into it the files that are encrypted into the folder in question. This not only works on computers but can also be used in the other storage such as flash disk drives, CD ROMs, and other.

Download Free Cryptainer LE : Mirror1


3. MySecretFolder.
mysecretfolder download
His name is also secret, so about its intention to keep the folder. This software has the option to choose features to hide the directory or folder with password protection. The first option just hides it without protecting with a password. The second option provides files with password protection. This application can be downloaded here.
 
Download Free MysecretFolder : Mirror1 | Mirror 2


4. FileGhost.
FileGhost
Well if that is more excited, because his name was a ghost .... FileGhost is another alternative tool. Same function, to protect files or folders. With this program, you safely can lock, hide, deny (deny) file reading, file writing, prevent file deletion step (deleting), copying (copying), displacement (moving, changing the name of the file / folder (renaming) and replacing. protection programs can also be applied to files, folders, volume hard disk, CD / DVD-ROM, flash cards or other storage media, regardless of the file system used (FAT or NTFS).
Download Free FileGhost : Mirror 1 | Mirror 2

Reference : http://recinay.wordpress.com/
[ Read More ]

How to Windows xp optimization

Windows XP operating system has many features and components embedded in the operating system. But some features did not need to be used and Windows XP still make loading into the computer system,so we can optimization this windows XP features.

Run Service.msc (module default Windows XP)

Windows XP do the loading of modules complete the program in order to comfort the user operating systems are always readily available. Unfortunately not everyone takes moduleprogram the loading of default WinXP system. Besides consuming memory resources because the module was first run when the computer is working, sometimes even making the Windows operating system became a little slower.

Features a program module that is not necessary to shut down by SERVICE.MSC facilities.

How to Windows xp optimization:

Go to the Start and Run and type "service.msc". Next will come from a program list service module which defaults to always be loaded by Windows XP. To turn off the service module of Windows, on the second picture you see on the list of programs and STATUS. On the status list, you can see if the program module is always running when Windows XP Windows work the first time, or automatically when needed and the last new work is not executed at all (Disable)

Below is a list of Windows components loaded by default but may not be required for some needs (Source Techtree) Unused Module Function module that can be turned off (Disable)

1. Computer Browser
This module is to monitor the list of computers that are connected into the Network.
Computer Browser Module can be turned off when you are using computers at home without being connected to the network / LAN

2. Distributed Link Tracking Client
This module is enabled to monitor the relationship between NTFS files within the computer itself or  network with a domain name. The function module is only needed if someone needs a link to another computer in a file.
Not all people need links to and from your computer to a file and you can turn off (Disable).

3. Error Reporting Service
Function module Error Reporting Service is to provide a report when Windows XP disturbed.
This function is not useful and can be at Disable

4. Help and Support
Getting the support files by pressing F1 to activate.
Are you quite often do and read the help file from Windows?, Turn off this feature

5. Indexing Service
Indexes contents and properties of files on local and remote computers aims to accelerate access to files by way of a flexibel.Service queue is not needed

6. Net Logon
Supports pass-through authentication of account logon events for computers in a domain. When you connect to the network and a domain. This feature is required
But if you only use the computer alone and do not own the domain. This feature can be turned off

7. NetMeeting Remote Desktop Sharing
This feature is to provide access to your computer via Netmeeting through an Intranet network.
If you are not willing to give access to others, especially by way of Remote into your computer. We recommend that this feature is turned off

8. Network Location Awareness (NLA)
This module is to record and store a list of network configuration and location information.
This function does not help, and can be turned off

9. Network Provisioning Service
Manages the XML configuration files on a domain basis for automatic network provisioning.
Not needed for home computers and simple network system. This feature can be turned off

10. Performance Logs and Alerts
Feature module to record the performance of computer and other activities that are recorded in a file (log file)
You do not need to bother with the performance of your Windows system, shut down because not much use for stand-alone.

11. Portable Media Serial Number Service
Retrieves the serial number of any portable media player connected to this computer.
The function module is not useful and is intended only for the Windows Media based / compatible ("PlaysForSure") portable. MP3 users do not need this feature and should be turned off

12. QoS RSVP
Provides network signaling and control delivery at the local traffic
The function module with the concept of providing greater bandwidth to application needs. In fact this function has little impact. Options can be turned off or permanent use

13. Remote Desktop Help Session Manager
Manages and controls Remote Assistance. "
Not yet known function for what, Remote Assistance will be accepted. Or not required and can be turned off

14. Remote Registry
Authorized remote users to modify the registry on a computer Better is turn off.

15. Security Center
Monitors system security settings and configurations. "Displays Pop Up when the firewall is down, Anti-virus has been out o date or deliberately turned off the Windows system updates.
If you always monitor the 3 functions above, this feature can off. Cause Security function not center only to monitor and prevent and better control directly from your safety program

16. Servers
Support file servers such as printers, file sharing or shared within the network
Could be required could not, if you do not share between computers within the network. This feature can be turned off.

17. Smart Card
Manages access to smart cards read by this computer. "
You use the Smart Card in your computer. If not should be turned off

18. SSDP Discovery Service
Enables discovery of UPnP devices on your home network. "Windows will monitor other hardware with Plug and Play system.
This function can be turned off when you no longer add another device or hardware that you use is permanent. But if you are using a lot of hardware should this feature remains activated

19.System Restore Service
Performs system restore functions. Windows can restore your Windows system to restore a backup performed when the set point. By enabling system restore will be easier to restore Windows if a crash and malfunction and mengembalikanWindows XP to time you do a backup.

20. TCP / IP NetBIOS Helper
Provides user experience theme management support for NetBIOS over TCP / IP (NetBT) service and NetBIOS name resolution
Turn off if you do not need NetBIOS for network

21. Themes
Provides user experience theme management. For performance reasons, such as the display interface Win2000. This feature can be run through the Desktop Properties. So there's no reason this module loaded
You can turn off this feature

22. Uninterruptible Power Supply
Manages an uninterruptible power supply (UPS) connected to the computer
It was obvious function when you are using UPS requires this functionality, this feature is specific only to the UPS is connected to a computer via COM port. When you can not turn off

23. Wireless Zero Configuration
Provides automatic function for the Wireless network adapter.
If you do not have a WiFi device can be turned off.

24. WMI Performance Adapter
Provides performance library information from WMI providers HiPerf
It is unclear to what, and can be turned off

25.Workstation
Creates and maintains client network connections to remote servers. If you are using file sharing within the network, leave this function still work.
If you do not use the sharing feature and your computer independent / stand alone. This feature can be turned off and not affect the Internet connection

=============================================
Discard unneeded programs from start-ups

As with other Microsoft operating systems, when installing the program into the hard drive. Generally, some programs put features like auto updates, drivers or additional programs on start-ups. Maybe you never realized bahwar program that placed in the start-up Windows too slow when Windows XP will be used.

To open and see what programs are loading when Windows XP first started working. You can type in the Run, with Regedit

Regedit function is to look at the Windows Registry and change it if necessary. The area lies at startup. Or use msconfig run through Run.

HKEY_LOCAL_MACHINE \ Software \ Microsoft \ Windows \ Curr entVersion \ Run

Most of the programs to be loaded on Windows XP System Windows XP outside the program are placed in areas RUN. Make sure when removing tasks on startup programs in the RUN directory is a program that you do not use.

If you have any doubts change Windows Registry, it's good to use the helper program such as TuneUp.

Results for optimizing Windows system

By changing the setup from the start module in Windows XP Service, Windows will have a greater source memory for applications. So the application has more memory space.

Risks on the optimization of this article

Using the optimization by changing the Service, registry and turn off the feature in Windows XP system is not free from some risks. You should already know what you did with the greatest risk is Windows XP you can not work properly until it can go into WinXP Desktop screen.

Do not forget, make changes to Windows XP is your hands, and the risk borne by yourself.
[ Read More ]

Computer Tips for Computer Security

Almost all people using computers today can change them, browsing the web, check email, and run a word processing program. The problem is that while computers are easy to use, those who have no knowledge about the problem of computer crime has a very difficult time understanding the reasons why it is important to ensure that their computers safe and secure. If you do not want to find yourself you call a computer repair Delaware men to help with virus or security breach, consider doing a few tips and tricks.

1. Update Your Antivirus Software

Antivirus software is great. There are tons of great programs to choose from and they will automatically scan your PC for viruses, malware, and more. The problem is that antivirus programs do not permanently set-and-go solutions. Internet growing rapidly and if you do not update your antivirus software regularly you will be vulnerable to some of the latest viruses and internet crimes out there.

2. Lock Your Computer

Your computer is your personal space. Every person walking into your home or office should not have access to your personal information. Log into the habit of locking your computer every time you walk away, even if you just walk out to the bathroom. computer security breaches can occur in a matter of mere minutes. Enter a password to login again will only take seconds and you will immediately return to work.

3. Avoid Strange Email Link

Be cautious when you receive an email from the company requesting your personal information, even if they look legitimate. Hackers will create an email address that appears similar to that used by the formal organization, but only slightly different. They will send you to web pages that seem to log-in page for the site you're used to. When you enter your information and recognize that you are in the wrong place, you will be given your user name and password. Do not use the link in the email to log-in page if you can avoid doing it.

4. Update Your PC Security

You may receive periodic emails from Microsoft to let you know that the latest security patches have been developed. Do not ignore an email or pop-up messages. They are designed to immediately improve the security breach that the developers identify the platform. Ignore this email and failed to make the update will leave your computer vulnerable as well. Not getting notifications? Go to Windows Update Center and find their own.

5. Select a Strong Password

According to the United States Computer Emergency Readiness Team, the attacker has access to a number of programs that enable them to find out your computer passwords. The more complex your password, the more work will be for them to know, and the more likely they will give up and switch to something easier. Choose a password with numbers, spaces, special characters, and a combination of both upper and lowercase letters.

Use care and caution when using your computer. Every time you enter the Internet you open yourself to potential security breaches. If you are not careful, you will be the next person you call a computer repair technician Delaware to help get things back to normal - even if possible!

Article sourcehttp://EzineArticles.com/?expert=Shelly_Bailey 
[ Read More ]

Install Windows XP to Acer Aspire M1641

Finally finished install Windows XP on the Acer Aspire M1641, at the beginning I was confused as well, the first time I tried to install windows xp on acer aspire M1641 computer so confused because after I enter the cd install windows xp there would not load or detect jamming hard drive that happens is a blue screen, after I check it turned out to be sata hard drive, so it means I have to install SATA drivers.
there are several ways that we can do to , which I know  4 steps for install windows xp into acer aspire M1641.
blue screen
Install windows xp Blue screen 
To do the install aspire M1641.

Select one from 4 steps to install windows xp to acer aspire m1641 bellow.

1. Download Flash BIOS SOP to your computer, or place to USB drive.
 (Download Flash Bios Sop Here.) There are two option .
  • Flash BIOS SOP for DOS.
         go into dos and install open DFB file from your directory computer or usb drive in dos... wait until the  upgrade is completed then restart the computer, install windows xp will as usual and will not happen blue screen again  or hard drive is not the detect. here are step by step.
(1)Execute DFB.bat in Dos
(2)After finish flashing BIOS, system will auto-reboot
(3)When system is on post screen,button “F1” to go to BIOS Menu for loading default
(4)When go to BIOS menu,move to item “Load Optimized Defaults” ,button it ,
Dialog : Load Optimized Default(Ok/Cancel)? will pop up and choice “Ok”
(5)After finish step(4),button “F10” , Dialog :Save and Exit Setup (Ok/Cancel) ? will
pop up and choice “Ok”
(6)After finish step(5),system will reboot and flashing BIOS in DOS is finished

or it could be you clone its windows xp from another computer in the form of ata to sata. after we upgraded flash bios sop, then windows xp should work, after that we install its drivers according to the spec motherboards.

  •     Flash BIOS SOP for Vista.
       Please follow up the step flash biossop.pdf from your current download directory.

2. Using a floppy disk, copy and extract the files into the floppy SATA drivers.
You can use the internal USB Floppy Disk or Floppy disk. Please note if you use an internal floppy disk, you must open the seal ACER on your CPU casing. If the seal is open, then your warranty will be void (void). Then when install XP after booting from CD press F6 to install third party drivers. The computer will automatically load the SATA drivers. Once installed the SATA drivers, then follow the installation instructions of Windows XP.

3. ACER Aspire M1641 is available on the internal memory card reader.
Besides Using the floppy disk you can use Secure Digital Card (SD Card). Just like floppy disks, copy and extract the SATA driver files into the SD card. Then Insert the SD card into Internal memory card reader. Next steps are used together with the tips first.

4. The next step is to combine the master windows XP with the SATA drivers.

For this step we need the software nlite (Download nlite here). Before installing the nlite, first make sure your PC already has Microsoft net.framework. If you do not have microsoft net.framework, download HERE
Install microsoft net.framework first, only then nlite install it.

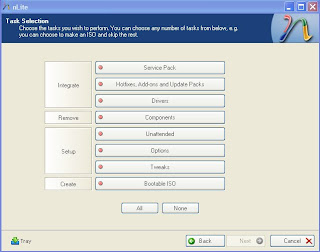
After the nlite installation is successful, open the program nlitenya, then click next, will appear the following picture:
nlite step 1

Browse for your windows XP master who would you combine with SATA drivers Acer M1641.Then click next, until the image appears as below:

nlite step 2


On the menu select the Driver integrate and to create the menu select the bootable ISO
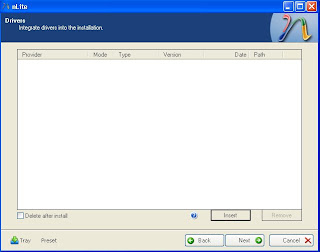
click next, and a new window will appear as below:

nlite step 3


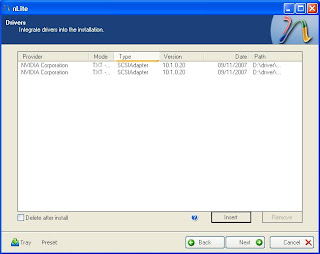
select Insert>> single driver>> and select the SATA drivers you've downloaded
click OK and it will appear like this:
nlite step 4
Click next and wait for its processes.
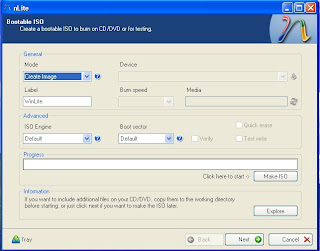
When you're done, click next again and it will appear the following picture:
Click on the make an ISO and select the ISO file it will you save on your hard drive.
then click next.
nlite finally step
Wait until the process is complete. If you've completed a Master Windows XP means you already have in it the SATA drivers Acer M1641, now an ISO file should you burn to a CD, can use nero or other burning tools.

After burning is complete, your XP CD master can be used to install the Acer M1641. without clicking F6 or F2, will perform a normal install.

DOWNLOAD LIST :
1. Flash Bios Sop Download here.
2. Nlite Download here.
3. microsoft.net Framework Download here.
[ Read More ]

Download Mozilla Firefox 4.0 beta 7

Web browser speed wars continue. After Microsoft releases Internet Explorer 9 Beta, turn Mozilla released Firefox 4 Beta on Wednesday (11/11/2010). Software that is claimed to be able to access the site faster than previous versions that can be downloaded from the Mozilla site.

mozilla firefox 4.o betaMozilla said the browser can run the latest version of the JavaScript and display graphics faster. Additional applications are also fully supported so developers can quickly adjust.

This performance improvement because it supported the use of new compilation JagerMonkey called JIT. Pengompilasi has been added to the Firefox JavaScript engine SpiderMonkey processing. Mozilla claims, benchmark results show that the new browser three times faster than Firefox 3.6.


Firefox 4 Beta also provide better support to the graphical processing unit (GPU) and take advantage of DirectX technologies on Windows and OpenGL on MacOS X. Firefox 4 Beta also supports WebGL, standard 3D graphics technology to carry out on site without additional plug ins.

Firefox final release of this latest new will be issued in early 2011. The next beta version will be issued before the final version. Kompas.com


Download Mozilla Firefox 4 beta here :

[ Read More ]

Protects your PC with a USB flash drive (Predators)

USB flasdisk which we normally use, I just know if Flasdisk are also in use for protecting our computers, but with the help of other software of course. this software predator is a tool to change our flashdisk usb into computer protector.

Predators name flasdisk applications could change into a key to the computer, it works very easy way of setting us in applications predators that have been installed on the computer, then flash it can now be used to make the computer lock by removing the pendrive it will lock the computer, mouse and keyboard will not be able to roads, monitor would not dim the flame. we could try it with this software

More about the predators:

8 steps you should take to secure your PC

PREDATOR will efficiently prevent people from using your computer without your knowledge if you take the following security measures:

1. Define a strong and unique Windows password. This password protects you from someone taking full control of your computer by restarting Windows in Safe Mode. If your password is at least 12 characters long and returns 0 result when searched on Google, it is strong. It should also be unique: do not use the same password to protect your mailbox or to access any internet account. Google "create user password Windows" to learn how to protect your Windows user account with a password.

2. Encrypt your files. Use BitLocker or EFS (Encrypting File System) if available in your edition of Windows, or install TrueCrypt. File encryption protects you from someone accessing your data by rebooting your computer with a Linux CD.

3. Disable the Autorun functionality in Windows. When a removable media (CD, DVD and some USB flash drives) that contains an Autorun program is inserted, the system automatically executes the program without requiring user intervention, even if your computer has been locked by Predator. This means that someone could mount a CD-Rom with an autorun program which would install malware in your PC.
Google "How to disable the Autorun functionality in Windows" to find how to disable it permanently, or check the "Disable Autorun" option in PREDATOR's settings to disable it when your session is locked.

4. Enable Windows Updates to keep your computer patched against known vulnerabilities.

5. Enable Windows Firewall to prevent unauthorized programs from accessing the network.

6. Allow your antivirus software to download daily updates.

7. Do not use software from untrusted sources. Trusted sources are the websites of the software creators and their original CDs or DVDs. Software repositories, P2P downloads, CD or DVD copies should be considered unsafe.

8. Be the unique user of your computer. Do not create additional user accounts. Never allow anyone to use your PC. It takes only 10 seconds to a hacker for installing a trojan program from the internet into your computer.

Finally, install PREDATOR. Define a strong PREDATOR password. Configure PREDATOR to autostart with Windows. Check the Protect Preferences option. Uncheck the Enable Pause and Enable Exit options. Enable Twitter log replication.
[ Read More ]

Windows OS Infected Virus

windows infected virus


Windows OS is infected by a virus, worm, or Trojan horse if your computer displays one or more of these things:

* Screen shots of weird messages or pictures appear.
* You have less available memory than you expected.
* Music or sounds plays randomly.
* Files get corrupted.
* Programs are files don't work properly.
* Unknown files or programs randomly appear.
* System properties fluctuate.

Computer viruses, worms, and Trojan horses deliver their payload or instructions through three common ways.
1 - When an individual runs an infected program so if you download a lot of things you should always scan the files before executing, especially executable files.
2 - When an individual boots a computer with an infected drive, so that is why it's important to not leave removable media in your computer when you shut it down.
3 - When an unprotected computer connects to a network. Today, a very common way that people get a computer virus, worm, or Trojan horse is when they open up an infected file through an email attachment.
virus computer infected

New ones come out by the numbers so that's why it's important to keep up to date with new ones that come out each day and there are literally thousands of malicious logic programs . Many websites keep track of this. There is no known method for providing 100% protection for any computer or computer network from computer viruses, worms, and Trojan horses, but people can take several precautions to significantly reduce their chances of being infected by one of those malicious programs. Whenever you start a computer you should have no removable media in the drives. This goes for CD, DVD, and floppy disks. When the computer starts up it tries to execute a boot sector on the drives and even if it's unsuccessful any given virus on the boot sector can infect the computer's hard disk. for any reason, such as when the hard disk fails and you are trying to reformat the drive make sure that the disk is not infected if you must start the computer using removable media.

virus
How can you protect your computer?
By using good quality internet securities software is the best way to protect your computer from any of the above. Kept up to date with the most recent virus signatures Purchasing this from a reputable security company is recommended to ensure that your software. If you are not up to date an unrecognised virus will not be stopped by the software. A full security package will protect you from viruses, Worms, Trojan horses, keyloggers and will detect when a hacker is attempting to hack into your computer and prevent them from gaining access when you are online or connected to a network. It is not advisable to use a free antivirus service as these do not provide adequate protection and are a false economy. Recommended internet security software companies are:- Norton, McAfee and others.

[ Read More ]

Keyboard or mouse Notebook Not function

This posting For newbie user like me, notebook or laptop sometimes an unexpected problem when we to install a new hardware or not, after we restart the keyboard or mouse could not function or locked.

This happened to me when installing new software and the problem of keyboard and mouse so it does not work. My first guess is because its hardware is damaged, when I look back and fro googling I finally found the answer, that it was because of errors in installing new software and setting error or whether it be from the bios of the new software installed.

The problem sometimes occurs on a notebook / laptop due to driver windows XP, do not have the appropriate driver with the driver keyboard / mouse it.
from various sources that I had read I found a few ways that can be done.
1. By clicking the button FN + F5.
2. Clicking the button FN + F9

3. If it still can not move the way the tide is the mouse usb, restart the notebook / laptop, use a usb mouse if you suppose the road.

* Go into control panel -> click system.
device_manager
* After the entry into the system Properties, click the Hardware tab then click device manager,

* In device manager the keyboard and mouse drivers on the reinstall it or try to roll back the driver,
unplug the usb mouse and then restart it. and hopefully be going back.
[ Read More ]

Maximizing memory card

Maximizing the use of memory can be done with help of software.
often feel a bit slow PC system as a aplication another run?, or, often feel the system does not respond as quickly as usual after you open a heavy application?


some because it could be a major cause of a problem such as a nearly full harddisk, processor was working hard, or less memory.


We can setting our virtual memory for add faster performance windows.
if the response lag issues and a less stable system arises, you should suspect your memory. as a device that holds data system, memory plays an extremely vital in terms of speed and the application opening the command execution process.
before it is executed by the processor, all the existing data are temporarily stored in these components.

therefore, it is important to keep the main memory performance remained best. The best step to do is to save memory space usage when the system is running.Memory running too much capacity used can make the system performance decreases or even make the system becomes unstable. however, sometimes these problems arise without us knowing it. understand what is behind the application we see, there are many execution orders or applications running programs.

natural if the above problems as often occurs when the installed memory capacity is very low while the system is running an application or command that is very wasteful memory capacity. it can be done by closing unused applications again or to restart all the memory back in shape.

but, what if such a solution step we can not do because we are running applications that important and can not be postponed? one of the most effective step is to use helper software to keep sufficient memory capacity.

one such software is a trial version Optimizer can be downloaded at www.pointstone.com which is the official site of the manufacturer.

1. Doing Optimization.
overview on the bar to see how much memory remains that can still be used. If you are in safe limits, you do not need to do optimization at all. however, if you look at the available memory capacity has lived a little when you feel the application is not open is not much you can do memory optimization by clicking on the optimization. before clicking this button, you can set the number of megabytes you want to liberate. Here you can set it as needed. more clear unused capacity, the system will work more stable and work performance is maintained.

You can perform automatic optimization of precaution to keep the system has sufficient memory capacity. to do that, Mark box Optimization existing Automatic bottom and arrange for immediate optimization as a minimum capacity of free memory terlampui. can also be arranged here safe limit of the desired capacity when empty optimasi done.

optimization results that have been done can be seen on the menu bar Statistics shown in the form of graphs and percentages. if you are not satisfied, you can do to optimize the process again until the free memory capacity is desired is fulfilled.

2. Close applications.
that are not necessary if the system still feels heavy and less stable although some applications have been closed, this software also provides the facility to turn off some command or application being run, whether intentional or behind the scenes. for this one, it is advisable to turn off applications you really understood the use of memory resources the most. To do this, you can click on the bar processes, select the application to shut down, and click the button (quick kill).

DoWnLoad :
[ Read More ]

Troubleshooting cab error when Installing Windows

When we install Windows XP with the cd sometimes happen for bad or corrupt data, CAB file not found or can not install it, it's very annoying and what more we really need the computer right now, for it not to save the CD windows xp us anywhere because it will make windows xp cd scratched and sometimes it can not be used again, and that will install windows trouble, save it was in a safe place that out of the reach of children.

Overcome problems that sometimes arise when installing.


here this sometimes happen :

Cab Errors

one of the problems that sometimes arise when installing windows is the emergence of Error Messages like the following.

1. Setup has detected the following decoding error. "Could not decode this setup (.cab) file. Setup will attempt to recover from this situation.
Click ok to continue."

2. Setup has encountered an error extracting the windows file to your computer.
To solve this issue, you may need to boot from the Emergency Boot Disk and run Setup from MS-DOS. if you continue to receive these errors, see the .cab errors section of this setup.txt file for additional information.

This message can occur due to several reasons, among others:

1. Initial possibility is that the windows installer CD is damaged, soiled with dust, finger print, or may have been scratched.

2. CD ROM drive is not functioning properly. optical lenses could be weakened or cd rom drive was too powerful to produce tremor through a laser beam of optical lenses cd rom can not read data from the CD installer with an accurate.

3. Computer Overclocking:
extract cabinet files (. Cab) is memory intensive, so the computer is in overclock higher than its default settings can cause decoding errors.

4. problems ram or cache (bad or Mismatched ram or cache). RAM is damaged and the use of type or size of different ram also likely to cause problems when installing any extract fle
example: using EDO and non-EDO RAM simultaneously.
using 2 pieces measuring 32 ram and 64 MB at once.

5. Enabled it to Ultra DMA (UDMA) in the BIOS Enabling this option may cause the flow of data transfer going too fast to be processed by the system.

6. Using third party memory manager.

7. Computer virus.

Several ways to overcome his problems.

1. CD installer clean with a soft cloth to remove fingerprints or dirty.

2. Use the "Real Mode CD-ROM drivers" from the CD ROM drive that we use to install. if there are no original drivers cd then run Windows Setup from MS DOS mode by booting from the floppy star up.

3. If the installation of Windows from a CD ROM drive problems, run the installation from the hard drive directly to first copy all files from a CD master windows installer on a new directory on the hard drive, if the copying fails, you can bet that the cd installer is broken.

4. Scan your Computer for virus.

5. If information .cab still error, try to extract manual all file cabinet.
[ Read More ]